This post was first published on July 7, 2015 ! Its contents might be outdated!
Introduction
I’m not sure since when, but bhyve now supports libvirt. That’s great news, given that libvirt is a universal tool which helps in managing VMs. There are quite a few hypervisors compatible with libvirt, for example KVM, Xen, Linux containers (LXC) and a bunch of others. On the other hand, there are only a few graphical fronteds compatible with it, for example Virtual Machine Manager (virt-manager), which is a general purpose VM management tool. This can be installed to a computer and the hypervisors can be managed from there. Virt-manager is generally good for a few hypervisors, with 10-20 VMs, but managing a cloud infrastructure is quite a challenge with it. There a few tools compatible with libvirt, which are targeted at clouds or greater deployment.
In this article, I will cover the Virtual Machine Manager (virt-manager). This tool allows for the basic management of VMs, such as installing, starting, deleting etc. The goal of this document is to introduce the installation and configuration of bhyve to a FreeBSD host, libvirt, and the virt-manager to a remote computer, then to explain how you can connect from the virt-manager to the remote host. This setup allows the management of VMs remotely. This article is customized for CentOS guest installation as a guest, however other Linux guests could be installed and used in a similar way.
As its current state, libvirt is not fully compatible with bhyve and therefore interacting with VMs with libvirt is not possbile. However, this article provides instructions for installing and managing VMs with bhyve itself.
Additional informations for this article
I use the following setup:
- FreeBSD 10.1-RELEASE-p13 - as the host computer
- Arch Linux current - as the remote computer
- These two computers are on one network
bhyve
So what is exactly bhyve? From the offical website:
bhyve, the “BSD hypervisor” is a hypervisor/virtual machine manager developed on FreeBSD and relies on modern CPU features such as Extended Page Tables (EPT) and VirtIO network and storage drivers.
It has been released on 20th January, 2014, so it’s a quite new, “shiny” technology. Therefore it is possible that a few bugs remain, or some feature do not work yet. If you encounter some, please report it. bhyve supports FreeBSD, OpenBSD, NetBSD and Linux distributions as a guest. Bhyve gets loaded and acts like KVM. This means, that bhyve itself is loaded into the kernel and that allows it to provide good performance to the virtual machines.
In order to boot Linux as a guest, it is important to have the sysutils/grub2-bhyve installed.
Installing and using bhyve
bhyve is by default installed on FreeBSD, it just needs to be loaded. Load the bhyve kernel module so:
| |
In order to load automatically while booting up the system. It appends a new line to the /boot/loader.conf file:
| |
Then, build sysutils/grub2-bhyve from ports:
| |
Or install the package:
| |
To get further information about bhyve:
| |
Installing and starting a CentOS guest
If the guest needs to be be connected to the network, a tap interface and a bridge between the physical interface and the tap has to be created. My physical interface is re0, it is important to check and correct the commands accordingly.
| |
Create the file, which will be used as the disk for the guest:
| |
A Device map has to be created in order to clarify, which file should be mapped to which virtual device. In the example, both the centos.img, the device.map file and the CentOS-7-x86_64-DVD-1503-01.iso (which is the CentOS installer) was placed in one folder. The content of the device.map file here is:
| |
To start up a Linux guest, two steps must be taken. First, point GRUB to the kernel and initrd, and then the guest can be started. The following line starts the GRUB, points to the previously created device.map file, selects the root device, allocates memory and assigns a name.
| |
Now the GRUB needs to be pointed to the vmlinuz and initrd files. First, check which devices are present:
| |
Check, which files are present in the CD:
| |
In the isolinux folder:
| |
Then locate vmlinuz and initrd:
| |
Boot the installer:
| |
The Linux kernel is now loaded, so it is possible to start the guest.
| |

CentOS CLI installer configured
If everything went right, the CentOS CLI installer has been started. After being installed, the instance has to be destroyed!
| |
Then the installed guest can be started:
| |
Also the Linux guest is installed, and a correct grub.cfg is present.
| |
Start the VM (without the installer ISO):
| |
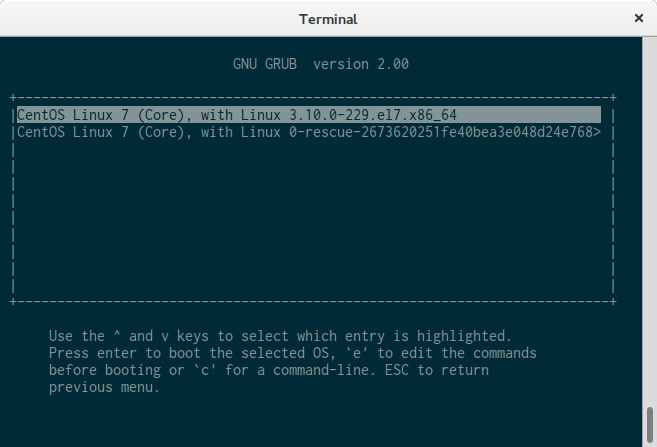
The config file, installed by the CentOS installer, applies the settings to GRUB and the choose option appears. When the OS is loaded:
| |
The previosly created tap0 interface is present in the guest, and it is connected to the network. After the network is configured, the VM is reachable over SSH. After shutting down the guest, it is important to destroy the instance!
| |
In order to find out, which VMs are running, the /dev/vmm/ shoud be checked.
| |
Installing and running FreeBSD as a guest
Naturally, it is possible to run FreeBSD as a guest. That’s a bit easier task than running Linux. A disk image file is needed to be created:
| |
Then running the installer from the downloaded FreeBSD installer ISO with a built in script:
| |
This will start up the guest, booting from the ISO and showing the guest on the terminal. From here, the installation could be performed.
libvirt
As I have mentioned before, libvirt is a very powerful tool that allows us to interact with hypervisors and management consoles. It is compatible with a bunch of hypervisors, and also with a lot of management tools. It not just makes the local management easier, but with a few hypervisors, it can be used remotely over SSH.
Installing libvirt on FreeBSD is pretty straightforward. devel/libvirt has to be either compiled from ports, or installed from packages.
Compiling from source:
| |
It is important to configure libvirt with bhyve support! Installing from packages:
| |
libvirt provides a command line tool, called “virsh” to interact with hypervisors. In order to start libvirt, the daemon has to be started:
| |
To start the libvirtd service automatically, when the host boots up, the following line needs to be added to the /etc/rc.conf file:
| |
[!NOTE] Unfortunately starting a VM (or domain, with virsh syntax) with virsh, freezes the libvirt daemon and the VM actually does not start. In other words, at its current state, it is not possible to use bhyve with libvirt. I hope that this bug will be solved soon. Please also note, that in the example, FreeBSD 10.1-RELEASE-p13 is used, and a possible fix could have been submitted and could be present in 11-CURRENT!
To start the instance with virsh, a centos.xml file has been created in the folder /usr/local/etc/libvirt/qemu with contents stated on the website of libvirt. Then the file has to be initialized:
| |
When it is initialized, the VM could be started:
| |
This is where it freezes. Starting a VM remotely with virt-manager will eventually work, when this issue has been fixed.
virt-manager
The Virtual Machine Manager (virt-manager) is an easy-to-use interface for managing VMs. It is compatible with libvirt and enables the user to manage bhyve (and a bunch of other hypervisors) remotely, or locally. The developer of virt-manager is Red Hat, and the first stable version has been released on 7th of September, 2014. I have been using this application for a long time to interact with KVM, and I find it a very handy tool.
Despite the fact that its not working as it’s current state with bhyve, here is the guide on how to continue. Because virt-manager interacts with libvirt and libvirt is unable to start a VM on bhyve, starting up a VM from virt-manager is not working. The first step is to install the virt-manager with the package manager of the distribution. On Arch Linux:
| |
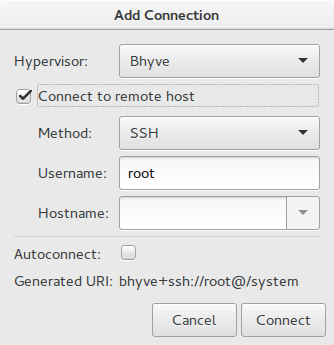
Once installed, it is possible to connect to the bhyve running on the FreeBSD.
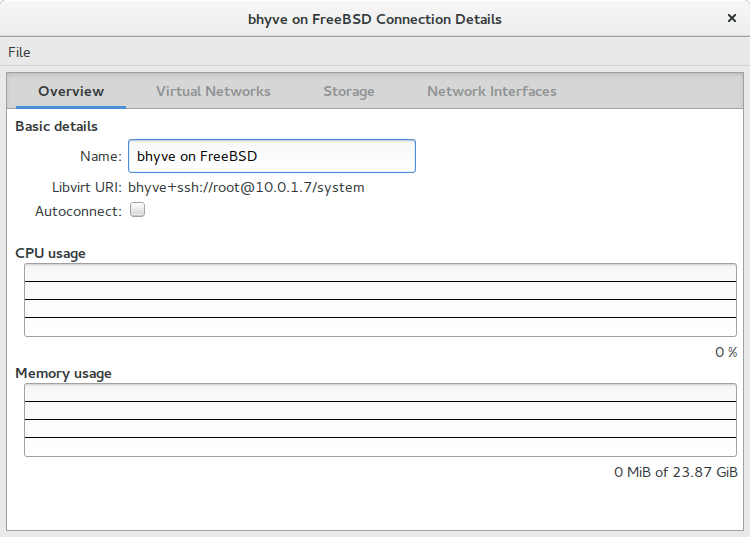
The connection has been added to the virt-manager
Summary
Despite the fact, that bhyve and libvirt have a few bugs, and do not work right now, my hopes are high conserning this combo. I find FreeBSD a very good operating system, which has just needed a fine hypervisor. I hope that the developers of bhyve and libvirt will find the problem soon and will fix it. Until that, it is possible to use bhyve from command line and access the guests from there until the SSH has been configured.
Comments
It is important for me to stress, that this article is written to inform, and to be a guide to accomplish something. I am not responsible for any data losses, or for anything that goes wrong. It is your responsibility to understand the meaning of the commands and to determine the outcome.
It is also very important to have a backup of everything.
Thanks, sources I used
I would like to thank everybody, who contributed to bhyve, libvirt and virt-manager, also the FreeBSD community, RedHat and everyone else who made this possible. I would like also to thank to artsies for proofreading this document. For this article, I used the following sources:
- FreeBSD Handbook - FreeBSD as a Host with bhyve
- libvirt.org - Bhyve driver
- FreeBSD Wiki - bhyve
- Wikipedia - Virtial Machine Manager
Thank you for reading!